Busy weekend?
Wow, it's been a busy weekend. I seem to skin the most when I'm sick, and this weekend unveiled a massive kidney-stone attack. At 29 years old, this shouldn't even be happening, but it's a pain that's unrivaled. Tried to be productive, however.
In brief, Singularity now has a working taskbar, albeit basic, some of the graphics blitted to the screen via LayerCuts, and a functional VWM using RabidVWM. Here are the details:
Taskbar Setting up xTaskbar requires more parameters than any other module I've ever set up, but the degree of control is truly impressive. I daresay I'll not use another taskbar module. It's got so much control over each button state (normal, active, minimized, hover, group, and flash). Once I grouped all the parameters together according to my scheme in the previous blog, it becomes a lot easier to deal with. Here's an example of the Active button state:
;----Active button state----
;tasks1ButtonBorderMethod .none
;tasks1ButtonAlphaTransparency 255
;tasks1ButtonTrueTransparent
tasks1ActiveButtonImage $LSimagefolder$taskbtn2.png
tasks1ActiveButtonImageLeftEdge 34
tasks1ActiveButtonImageRightEdge 1
tasks1ActiveButtonImageTopEdge 0
tasks1ActiveButtonImageBottomEdge 0
tasks1ActiveButtonImageMode
tile-horizontal
;tasks1ButtonSaturationIntensity 255
;tasks1ButtonHueIntensity 0
;tasks1ButtonHueColor ffffff
tasks1ActiveIconX 4
tasks1ActiveIconY 4
tasks1ActiveIconSize 24
tasks1ActiveIconSaturationIntensity 255
tasks1ActiveIconHueIntensity 0
tasks1ActiveIconHueColor ffffff
tasks1ActiveFont Arial
tasks1ActiveFontSmoothing
tasks1ActiveFontHeight 14
tasks1ActiveFontLeftBorder 34
tasks1ActiveFontTopBorder 4
tasks1ActiveFontBottomBorder 10
tasks1ActiveFontColor ffffff
tasks1ActiveFontBold
tasks1ActiveFontItalic false
tasks1ActiveFontUnderline false
tasks1ActiveFontShadow
tasks1ActiveFontShadowColor 444444
tasks1ActiveFontShadowX 1
tasks1ActiveFontShadowY 1
;tasks1ActiveFontOutline
;tasks1ActiveFontOutlineColor 555555
;tasks1ActiveFontNoEllipsis false
tasks1ActiveFontAlign left
tasks1ActiveFontVertAlign center
Something else that's becoming entertaining is that xTaskbar permits multiple taskbars. In the above example, you can see that each line is preceded by tasks1.This means I can fulfill my vision of having 3 taskbar types that the user can select between on-the-fly. The first version I implemented has 24x24 icons and text, the next will just be 32x32 icons, and perhaps a final version just showing 24x24 icons.
The hardest part of setting up the taskbar was getting the graphics set right. Below are two graphics, the first corresponding to the normal button state and the second to the active button state:

 To give each kind of a "chiselled" appearance, I used a Photoshop layer which was set to the "overlay" blending method and 25-50% opacity and drew a white vertical line along the left edge of each graphic, and a black line against the right. This meant that to complete the look, a similar dark line must be drawn on the graphic that will appear immediately to the left of the taskbar, and a similar white line must be drawn on the end-part of the taskbar background graphic. Took a bit to decide where the lines should be positioned to maximize the effect with the minimum of effort. Ended up being the long way after all.
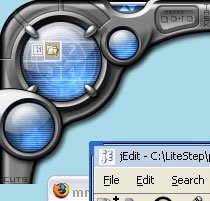
Here's what the current taskbar actually looks like when implemented:

Graphic shortcuts using LayerCuts Started carving up graphics from the Photoshop file into PNG images with AlphaTransparency to start plunking graphics onto the desktop. My next blog will probably be a review of the techniques I use to slice the images. I should also mention that although LayerCuts is a shortcut module, not all of the graphics I'm sticking on the desktop are active buttons. There are quite a few I'm using just as graphics; this is a common method with many graphically-rich themes. Some will eventually become buttons, but there are some just to look pretty and provide visual continuity between the buttons. The graphics below are non-functional types inserted just to provide drop-shadows and fill in graphics between the buttons:
*shortcut "ac1":ac1 175 34 ac1.png .none .none #1 a:255 .none .none .none
*shortcut "ac2":ac2 141 34 ac2.png .none .none #1 a:255 .none .none .none
*shortcut "ac3":ac3 91 18 ac3.bmp .none .none #1 a:255 .none .none .none
*shortcut "ac4":ac4 102 62 ac4.png .none .none #1 a:255 .none .none .none
*shortcut "ac5":ac5 91 81 ac5.png .none .none #1 a:255 .none .none .none
*shortcut "ac6":ac6 58 101 ac6.png .none .none #1 a:255 .none .none .none
*shortcut "ac7":ac7 0 156 ac7.png .none .none #1 a:255 .none .none .none
These are just non-functional shortcuts used as eye-candy. Just wanted to see how things are going to look in relation to one another on the screen. Here's how they look altogether:

Setting up RabidVWM The center of that largest sphere will be the VWM, 4 virtual desktops presented in a square configuration. Many themers use the same graphic tiled to represent each desktop, but that won't float in this theme because the VWM background must look seemless to the rest of the sphere.
Luckily, RabidVWM provides all this flexibility. The VWM here is just represented by one indexed bitmap:
 The miniwindows (graphics drawn to resemble windows on a given desktop) will be drawn dynamically using transparent flat-color boxes.
When coding, a key point I had to look our for is that OTS2 themes now store some RabidVWM settings in the user's personal.rc file, something that's getting my old OTS1 themes in trouble when users try to use them with the new installer. The settings used for the VWM in this theme just specify the graphics, none of the behaviors. This way the user can tweak their own file to change behavior for each theme, rather than hacking each theme to get the behavior they want. Here's the coding in Singularity's ''theme.rc'':
;----[ rabidvwm ]----
VWMPos 31 41
VWMSize 60 40
VWMDesks 2 2
VWMBackBmp vwmbg.bmp
VWMWinColor aaaaaa
VWMWinBorderColor ffffff
VWMWinBevel 1
VWMWinAlpha 180
VWMTitleColor ffffff
VWMSelColor cccccc
VWMSelBorderColor ffffff
VWMSelBorder 1
VWMSelAlpha 100
VWMShowIcons
VWMScaleIconToFit
Just 15 parameters! Not bad.
In brief, Singularity now has a working taskbar, albeit basic, some of the graphics blitted to the screen via LayerCuts, and a functional VWM using RabidVWM. Here are the details:
Taskbar Setting up xTaskbar requires more parameters than any other module I've ever set up, but the degree of control is truly impressive. I daresay I'll not use another taskbar module. It's got so much control over each button state (normal, active, minimized, hover, group, and flash). Once I grouped all the parameters together according to my scheme in the previous blog, it becomes a lot easier to deal with. Here's an example of the Active button state:
;----Active button state----
;tasks1ButtonBorderMethod .none
;tasks1ButtonAlphaTransparency 255
;tasks1ButtonTrueTransparent
tasks1ActiveButtonImage $LSimagefolder$taskbtn2.png
tasks1ActiveButtonImageLeftEdge 34
tasks1ActiveButtonImageRightEdge 1
tasks1ActiveButtonImageTopEdge 0
tasks1ActiveButtonImageBottomEdge 0
tasks1ActiveButtonImageMode
tile-horizontal
;tasks1ButtonSaturationIntensity 255
;tasks1ButtonHueIntensity 0
;tasks1ButtonHueColor ffffff
tasks1ActiveIconX 4
tasks1ActiveIconY 4
tasks1ActiveIconSize 24
tasks1ActiveIconSaturationIntensity 255
tasks1ActiveIconHueIntensity 0
tasks1ActiveIconHueColor ffffff
tasks1ActiveFont Arial
tasks1ActiveFontSmoothing
tasks1ActiveFontHeight 14
tasks1ActiveFontLeftBorder 34
tasks1ActiveFontTopBorder 4
tasks1ActiveFontBottomBorder 10
tasks1ActiveFontColor ffffff
tasks1ActiveFontBold
tasks1ActiveFontItalic false
tasks1ActiveFontUnderline false
tasks1ActiveFontShadow
tasks1ActiveFontShadowColor 444444
tasks1ActiveFontShadowX 1
tasks1ActiveFontShadowY 1
;tasks1ActiveFontOutline
;tasks1ActiveFontOutlineColor 555555
;tasks1ActiveFontNoEllipsis false
tasks1ActiveFontAlign left
tasks1ActiveFontVertAlign center
Something else that's becoming entertaining is that xTaskbar permits multiple taskbars. In the above example, you can see that each line is preceded by tasks1.This means I can fulfill my vision of having 3 taskbar types that the user can select between on-the-fly. The first version I implemented has 24x24 icons and text, the next will just be 32x32 icons, and perhaps a final version just showing 24x24 icons.
The hardest part of setting up the taskbar was getting the graphics set right. Below are two graphics, the first corresponding to the normal button state and the second to the active button state:

 To give each kind of a "chiselled" appearance, I used a Photoshop layer which was set to the "overlay" blending method and 25-50% opacity and drew a white vertical line along the left edge of each graphic, and a black line against the right. This meant that to complete the look, a similar dark line must be drawn on the graphic that will appear immediately to the left of the taskbar, and a similar white line must be drawn on the end-part of the taskbar background graphic. Took a bit to decide where the lines should be positioned to maximize the effect with the minimum of effort. Ended up being the long way after all.
Here's what the current taskbar actually looks like when implemented:

Graphic shortcuts using LayerCuts Started carving up graphics from the Photoshop file into PNG images with AlphaTransparency to start plunking graphics onto the desktop. My next blog will probably be a review of the techniques I use to slice the images. I should also mention that although LayerCuts is a shortcut module, not all of the graphics I'm sticking on the desktop are active buttons. There are quite a few I'm using just as graphics; this is a common method with many graphically-rich themes. Some will eventually become buttons, but there are some just to look pretty and provide visual continuity between the buttons. The graphics below are non-functional types inserted just to provide drop-shadows and fill in graphics between the buttons:
*shortcut "ac1":ac1 175 34 ac1.png .none .none #1 a:255 .none .none .none
*shortcut "ac2":ac2 141 34 ac2.png .none .none #1 a:255 .none .none .none
*shortcut "ac3":ac3 91 18 ac3.bmp .none .none #1 a:255 .none .none .none
*shortcut "ac4":ac4 102 62 ac4.png .none .none #1 a:255 .none .none .none
*shortcut "ac5":ac5 91 81 ac5.png .none .none #1 a:255 .none .none .none
*shortcut "ac6":ac6 58 101 ac6.png .none .none #1 a:255 .none .none .none
*shortcut "ac7":ac7 0 156 ac7.png .none .none #1 a:255 .none .none .none
These are just non-functional shortcuts used as eye-candy. Just wanted to see how things are going to look in relation to one another on the screen. Here's how they look altogether:
Setting up RabidVWM The center of that largest sphere will be the VWM, 4 virtual desktops presented in a square configuration. Many themers use the same graphic tiled to represent each desktop, but that won't float in this theme because the VWM background must look seemless to the rest of the sphere.
Luckily, RabidVWM provides all this flexibility. The VWM here is just represented by one indexed bitmap:
 The miniwindows (graphics drawn to resemble windows on a given desktop) will be drawn dynamically using transparent flat-color boxes.
When coding, a key point I had to look our for is that OTS2 themes now store some RabidVWM settings in the user's personal.rc file, something that's getting my old OTS1 themes in trouble when users try to use them with the new installer. The settings used for the VWM in this theme just specify the graphics, none of the behaviors. This way the user can tweak their own file to change behavior for each theme, rather than hacking each theme to get the behavior they want. Here's the coding in Singularity's ''theme.rc'':
;----[ rabidvwm ]----
VWMPos 31 41
VWMSize 60 40
VWMDesks 2 2
VWMBackBmp vwmbg.bmp
VWMWinColor aaaaaa
VWMWinBorderColor ffffff
VWMWinBevel 1
VWMWinAlpha 180
VWMTitleColor ffffff
VWMSelColor cccccc
VWMSelBorderColor ffffff
VWMSelBorder 1
VWMSelAlpha 100
VWMShowIcons
VWMScaleIconToFit
Just 15 parameters! Not bad.
posted by mrbiotech at
7:13 PM
![]()


1 Comments:
thought-provoking, mootable pv. just my thoughts, well anyways gl & be chipper is what i say
By Anonymous, at 3:34 PM
Post a Comment
<< Home